How to fix ‘Couldn’t Fetch’ Sitemap Error in GSC (Shopify Guide)
If you’re seeing the “Couldn’t Fetch” or “Sitemap could not be read” error in Google Search Console after submitting your Shopify sitemap, don’t worry – you’re not alone, and it’s fixable.
In this post, we’ll walk you through common reasons this happens and how to create a manual sitemap as a workaround to get your site indexed properly by Google.
What Is a Sitemap and Why Does It Matter?
Every Shopify store automatically generates a sitemap.xml file. This file includes links to all of your store’s:
Products
Collections
Pages
Blog posts
Primary product images
Search engines like Google and Bing use this file to crawl your site and ensure your pages appear in search results. Submitting your sitemap to Google Search Console (GSC) makes it easier for Google to discover and index your pages.
Learn more about Shopify’s built-in sitemaps.
Common Reasons for “Couldn’t Fetch” Errors in GSC

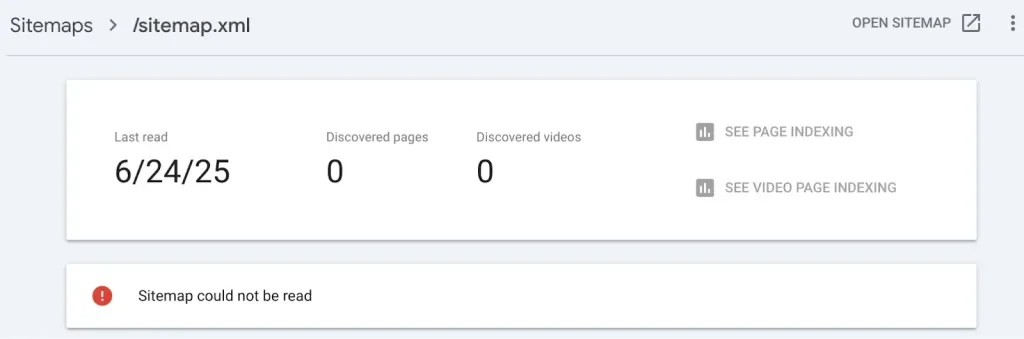
If you’ve submitted your Shopify sitemap to GSC and are seeing a ‘Couldn’t Fetch’ or ‘Sitemap could not be read’ error, here are a few things to check first:
Double-check your domain setup in GSC
Make sure the domain matches exactly, including “www” if it’s part of your URL (e.g., https://www.myshopifystore.com vs https://myshopifystore.com).
2. Verify the sitemap URL
Check that you are inputting the correct sitemap URL. Shopify’s auto-generated sitemap is located at <YourShopifyStoreHere>/sitemap.xml (e.g. https://myshopifystore.com/sitemap.xml).
Test the sitemap in your browser
Open the sitemap URL in a browser to confirm that it loads properly.
Check the robots.txt file
Ensure your sitemap is included and not being blocked.
Validate your sitemap
Use an online XML validator to check for any structural issues in the file.
Try submitting the sitemap to Bing Webmaster Tools
If it works there, the issue may be specific to GSC rather than your sitemap.
Still Not Working? Create a Manual Sitemap Instead
If you’ve tried all of the above and GSC still can’t fetch your sitemap, here’s a workaround: create and upload a manual sitemap file.
Follow these steps:
Create a new XML file
Open any text or code editor and create a new file.
Name it something like manual-sitemap.xml.
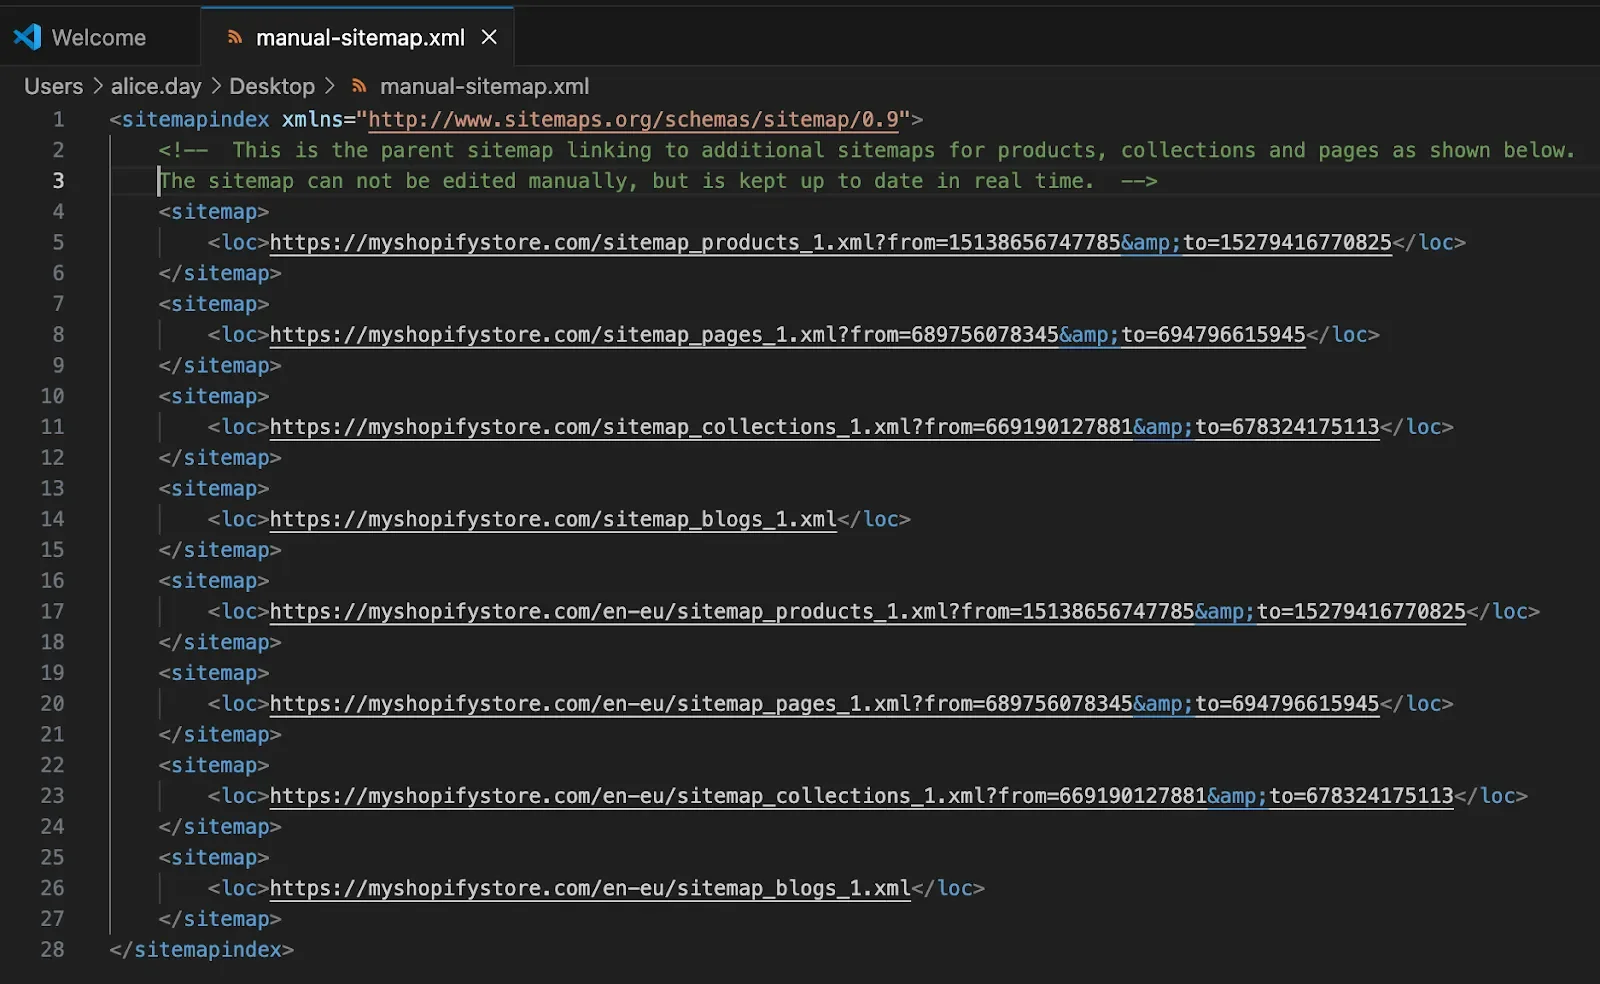
Copy content from the first page of your auto-generated sitemap
Why only the first page?
Shopify automatically paginates your sitemap into separate sections for products, collections, and blogs. By including just the main links, you’re still allowing Shopify to auto-manage the rest.
Clean up the formatting
Make sure the file is properly formatted as XML.
Replace any & symbols with &
It should look something like this:
Upload the file to your Shopify store
Go to your Shopify admin > Content > Files.
Upload your manual-sitemap.xml file.
Check that it’s displaying correctly
Visit the file directly in your browser using the URL format: https://<YourShopifyStoreHere>/cdn/shop/files/<YourFileNameHere> (e.g. https://myshopifystore.com/cdn/shop/files/manual-sitemap.xml).
It should look identical to the auto-generated sitemap.
Submit it to Google Search Console
Use the following path when submitting the sitemap in GSC: /cdn/shop/files/<YourFileNameHere> (e.g. /cdn/shop/files/manual-sitemap.xml).
What to Expect After Submitting
In most cases, Google Search Console will accept and index the manual sitemap right away. It may take some time for individual pages to show a “Success” status, but this is normal.
Final Thoughts
While Shopify does a great job of managing sitemaps automatically, occasionally you’ll need to step in with a manual fix – especially if Google is being picky.
By following the steps above, you should be able to resolve the “Couldn’t Fetch” or “Sitemap could not be read” error and get your pages properly indexed.
by Alice Day - Theme Developer @ vvast